Support
You can earn rewards by referring new customers to our services. It’s a simple way to benefit while helping others discover reliable hosting solutions.
Any individual or legal entity registered in our billing system can participate in our program.
Yes, individuals can become our partners. We welcome partnerships from both individuals and businesses. Please reach out to our team for more details on how to join our partnership program.
To become our partner, please register in our billing panel and submit a request for a unique identifier. This will allow us to set up your partnership account and provide the necessary tools and support.
Your reward is calculated as a percentage of the monthly payment made by the referred customer, based on the following tiers:
- 3% – for payments between 0 and 50 euros
- 5% – for payments between 50 and 200 euros
- 7% – for payments between 200 and 500 euros
- 10% – for the amount exceeding 500 euros
The minimum withdrawal amount for affiliate earnings is 100 euros.
The reward is paid once a month upon request to a bank account or PayPal.
For detailed information, please visit our website at https://melbicom.net/legal
Currently, we do not offer a trial period.
We utilize a variety of CPU models, ranging from Intel Xeon E5-2680v2 to E5-2680v4. However, please note that we cannot guarantee or predict which specific processor will be assigned to the cluster node hosting your virtual machine.
The minimum payment period for our services is one month, ensuring flexibility and convenience for our customers.
The only way to change your default IP address is to order a new IP. It will cost you additional 3 €. Please note that IP addresses are assigned automatically it is impossible to choose a specific IP range.
“Unmetered bandwidth” indicates that there are no additional charges based on the amount of data transferred to and from your cloud server monthly. This feature enables worry-free data transfer without overage fees. Typically, personal or small business website operators do not exceed our fair usage policies. However, if you anticipate consistent, heavy bandwidth usage, our cloud servers may not be the ideal choice. In such cases, consider our dedicated servers with guaranteed channels . Note that excessive use on a cloud server can lead to bandwidth speed reduction as per our terms of service, ensuring fair usage for all clients.
Bandwidth Limits for Cloud Linux Server Solutions:
In Fujairah and Mumbai:
• 2TB/month for KVM-1-FJR, KVM-1-BOM, WIN-2-FJR, WIN-2-BOM plans.
• 4TB/month for KVM-2-FJR, KVM-2-BOM, WIN-4-FJR, WIN-4-BOM plans.
• 5TB/month for higher-tier plans.
In Lagos:
• 1TB/month for KVM-1-AF, WIN-2-AF plans.
• 2TB/month for KVM-2-AF, WIN-4-AF plans.
• 3TB/month for KVM-4-AF, WIN-6-AF plans.
• 4TB/month for KVM-6-AF, WIN-8-AF plans.
• 5TB/month for KVM-8-AF, WIN-10-AF plans.
Upon exceeding these limits, bandwidth is reduced to 10Mbit/s. For all other plans, bandwidth is up to 1Gbit/s, reduced to 100 Mbit/s if the 5TB monthly quota is exceeded.
Please open a support ticket and ask to upload own ISO image. After that the feature will be allowed.
We offer a wide range of Linux and Unix-like operating systems. If you require a Windows-based operating system, please select one of our WIN plans specifically designed for Windows environments.
Mail ports are filtered. You should contact our support if you need to open mail ports. Additional account verification may be required.
1. Login to Your Client Area and head to the Services list.
2. Select your Private Network from your service list.
3. Select the VPS from the available pool you would like to add a private network for.
4. Click on Save Changes
It will take a couple of minutes for the changes to be propagated to your vMesh network to be in Status Active / Ready.
You will find below the steps required to configure your Private Network for Linux Distribution (Netplan & Interface file). You would simply need to replicate the following setup for all the VPS defined in your network. Each VPS would need their own Private Network IP Address (e.g., 10.0.0.2, 10.0.0.3, 10.0.0.4).
Ubuntu 20.04 / 22.04 / 24.04 and Debian 11 / 12
1. Identify Your Network Interface & Naming Scheme:
ip addr
2. Edit Netplan Configuration:
sudo nano /etc/netplan/01-netcfg.yaml
3. Add the Following Configuration:
network:
  version: 2
  renderer: networkd
  ethernets:
    eth1:
      dhcp4: no
      addresses:
        - YourAssignedIP/24 # (e.g., 10.0.0.2)
4. Apply the Configuration:
sudo netplan apply
Debian Older Versions (Using /etc/network/interfaces)
1. Edit the Interfaces File:
sudo nano /etc/network/interfaces
2. Add the Following Lines:
auto eth1
iface eth1 inet static
  address YourAssignedIP # (e.g., 10.0.0.2)
  netmask 255.255.255.0
3. Restart Networking Service:
sudo systemctl restart networking
CentOS 9 Stream / AlmaLinux 8 & 9 / Rocky Linux 8.6 & 9.x
1. Navigate to Network Scripts Directory:
cd /etc/sysconfig/network-scripts/
2. Create or Edit the Interface Configuration File:
sudo nano ifcfg-eth1
3. Add the Following Configuration:
DEVICE=eth1
BOOTPROTO=none
ONBOOT=yes
IPADDR=YourAssignedIP # (e.g., 10.0.0.2)
NETMASK=255.255.255.0
4. Restart Network Service:
sudo systemctl restart NetworkManager
Currently, we do not offer a trial period.
The minimum payment period for our services is one month, ensuring flexibility and convenience for our customers.
The only way to change your default IP address is to order a new IP. It will cost you additional 3 €. Please note that IP addresses are assigned automatically it is impossible to choose a specific IP range.
“Unmetered bandwidth” indicates that there are no additional charges based on the amount of data transferred to and from your cloud server monthly. This feature enables worry-free data transfer without overage fees. Typically, personal or small business website operators do not exceed our fair usage policies. However, if you anticipate consistent, heavy bandwidth usage, our cloud servers may not be the ideal choice. In such cases, consider our dedicated servers with guaranteed channels . Note that excessive use on a cloud server can lead to bandwidth speed reduction as per our terms of service, ensuring fair usage for all clients.
Bandwidth Limits for Cloud Linux Server Solutions:
In Fujairah and Mumbai:
• 2TB/month for KVM-1-FJR, KVM-1-BOM, WIN-2-FJR, WIN-2-BOM plans.
• 4TB/month for KVM-2-FJR, KVM-2-BOM, WIN-4-FJR, WIN-4-BOM plans.
• 5TB/month for higher-tier plans.
In Lagos:
• 1TB/month for KVM-1-AF, WIN-2-AF plans.
• 2TB/month for KVM-2-AF, WIN-4-AF plans.
• 3TB/month for KVM-4-AF, WIN-6-AF plans.
• 4TB/month for KVM-6-AF, WIN-8-AF plans.
• 5TB/month for KVM-8-AF, WIN-10-AF plans.
Upon exceeding these limits, bandwidth is reduced to 10Mbit/s. For all other plans, bandwidth is up to 1Gbit/s, reduced to 100 Mbit/s if the 5TB monthly quota is exceeded.
Mail ports are filtered. You should contact our support if you need to open mail ports. Additional account verification may be required.
We utilize a variety of CPU models, ranging from Intel Xeon E5-2680v2 to E5-2680v4. However, please note that we cannot guarantee or predict which specific processor will be assigned to the cluster node hosting your virtual machine.
You have the option to choose between Windows Server 2019 and Windows Server 2022, depending on your specific needs and preferences.
1. Login to Your Client Area and head to the Services list.
2. Select your Private Network from your service list.
3. Select the VPS from the available pool you would like to add a private network for.
4. Click on Save Changes
It will take a couple of minutes for the changes to be propagated to your vMesh network to be in Status Active / Ready.
Open Network Connections:
Press Windows Key + R, type ncpa.cpl, and press Enter.
Identify the Network Adapter:
Right-click on the adapter connected to the private network (e.g., Ethernet 2) and select Properties.
Configure TCP/IPv4 Settings:
- Select Internet Protocol Version 4 (TCP/IPv4) and click Properties.
- Choose Use the following IP address and enter:
- IP address: YourAssignedIP (e.g., 10.0.0.2)
- Subnet mask: 255.255.255.0
- Default gateway: Leave blank.
- Click OK to save the settings.
Verify the Configuration:
ipconfig
Ensure the IP settings are correctly applied.
Additional Notes
- Firewall Configuration: Ensure that your firewall settings allow traffic through the private network interface.
- No Gateway Required: Typically, a gateway is not needed for the private network to operate.
- Choosing IP Ranges:
- Common Private IP Ranges:
- 10.0.0.0 to 10.255.255.255
- 172.16.0.0 to 172.31.255.255
- 192.168.0.0 to 192.168.255.255
- Avoid Conflicts: Ensure the IP range you select does not overlap with other networks you are connected to.
- Common Private IP Ranges:
- Testing Connectivity: You can test the connection by pinging another device on the private network:
ping OtherDeviceIP # (e.g., 10.0.0.2)
1. Log in to your Client Area and navigate to the Services list.
2. Select your FastPath DNS Service from the list.
3. Click Add a DNS Zone, and Add the Domain name you would like to delegate.
4. Click on “Records” for your newly added Domain and click on “Add Record”
5. You may proceed by settings the DNS records you would like to set for your domain.
6. Once your records are set, you may change the Nameservers at your domain registrar.
Important: When changing your Nameservers for the first time, please note that DNS propagation can take up to 24-48 hours.
A DNS zone is a centralized file or container that holds all the DNS records for your domain. It defines how your domain behaves and directs traffic, ensuring that users and services can access your website, email, and other resources seamlessly.
A DNS record is like an instruction manual for your domain, guiding the internet on how to handle requests for your website, email, or other services. Each record serves a specific purpose:
•A Record: Points your (sub)domain to an IPv4 address.
•AAAA Record: Points to an IPv6 address.
•MX Record: Routes emails to your mail server.
•CNAME Record: Creates an alias, linking one (sub)domain to another.
•TXT Record: Stores text information for verification, security, or configuration.
•SRV Record: Specifies services and ports for servers like messaging or VoIP.
Together, these records ensure your domain behaves as expected, directing users and services to the right resources. The TTL (Time to Live) value for each record determines how long it’s cached before updates take effect.
DNS Anycast routes DNS queries to the closest server from our global network, ensuring faster responses, improved reliability, and reduced latency. It enhances performance and resilience by distributing traffic across our 50+ Worldwide points of presences.
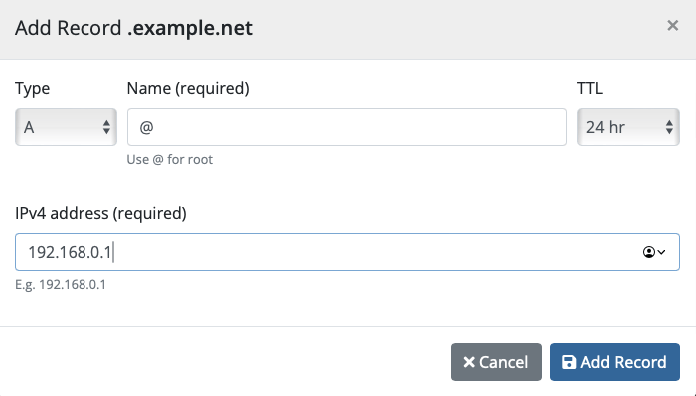
To create an A record for the root domain (e.g., example.net), use @ as the host.
Example: example.net IN A 192.168.0.1
This ensures the root domain resolves to the specified IP address.
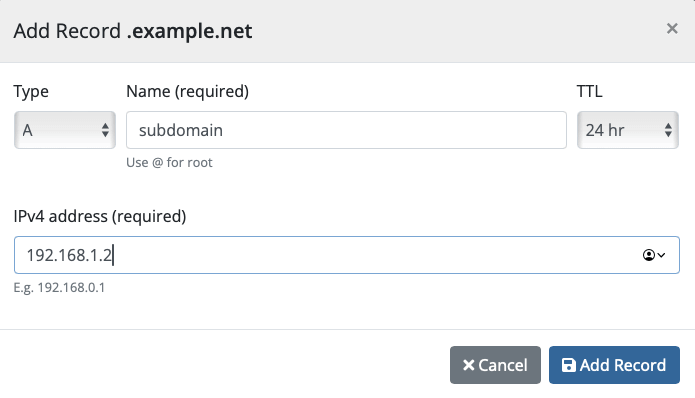
Create a DNS A Record
A records map subdomains to specific IPv4 addresses. Example for subdomain.example.net:
- Name:
subdomain - IPv4 Address:
192.168.1.2
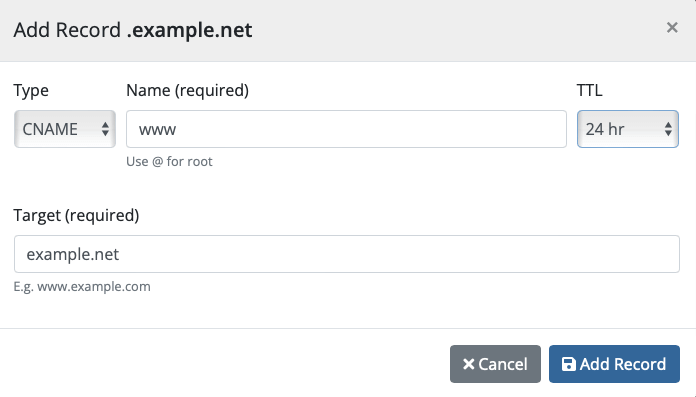
Create a CNAME Record
CNAME records redirect subdomains to another domain. Example for www subdomain:
- Name:
www - Target:
example.net
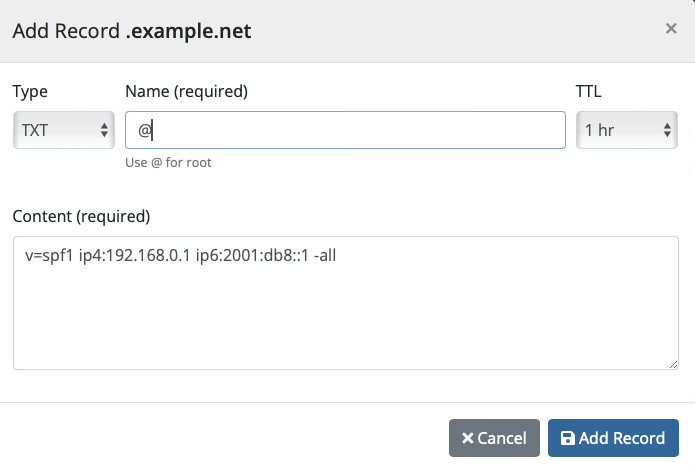
Create a TXT Record (SPF Configuration)
TXT records are used for SPF, which prevents email spoofing. Example configuration:
- Name:
@ - Content:
v=spf1 ip4:192.168.0.1 ip6:2001:db8::1 -all
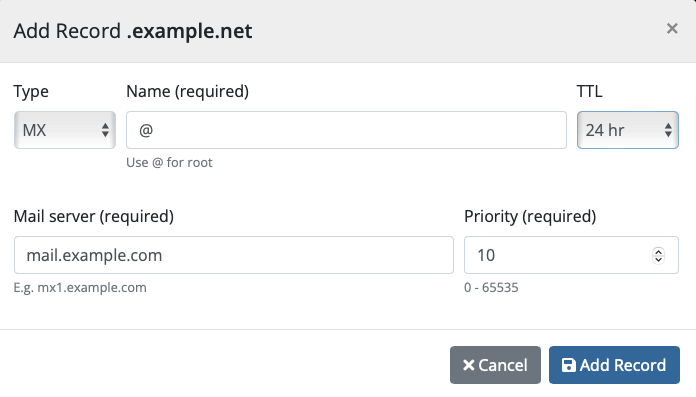
Create a MX Record
MX records direct emails to the mail server. Here’s an example:
- Name:
@ - Mail Server:
mail.example.com - Priority:
10
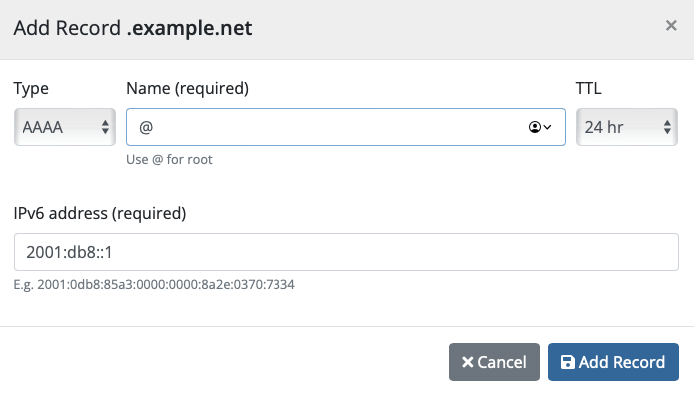
Create a AAAA Record (IPv6)
AAAA records map a domain to an IPv6 address. Example:
- Name:
@ - IPv6 Address:
2001:db8::1
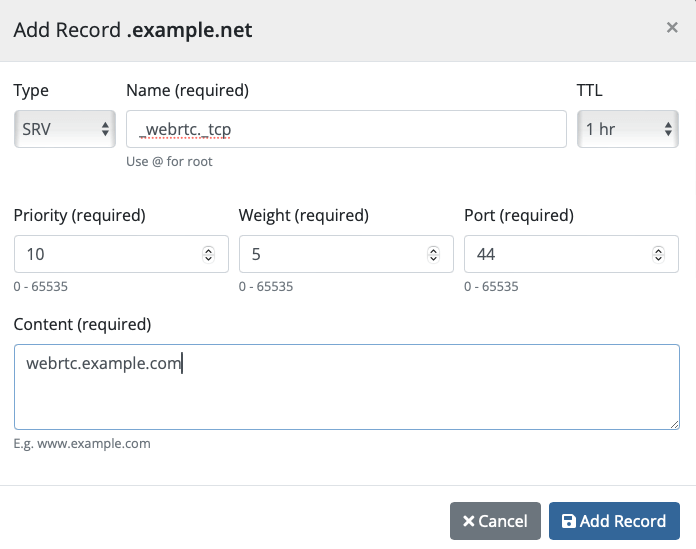
Create a SRV Record
SRV records define services like SIP, VoIP, or WebRTC. Here’s an example:
- Name:
_webrtc._tcp - Priority:
10 - Weight:
5 - Port:
44 - Content:
webrtc.example.com