Blog

How to use Kubernetes with vMesh
This guide details the process of deploying Kubernetes (K8s) clusters on vMesh private networks, providing low latencies, improved security and network isolation for your containerized applications.
Prerequisites
- Multiple Linux VPS Cloud instances with at least Ubuntu 22.04 installed
- Administrative (root) access to each VPS
- vMesh Private network connectivity between VPS instances. You may refer to this guide.
We will replicate the following network topology as an illustrative example:
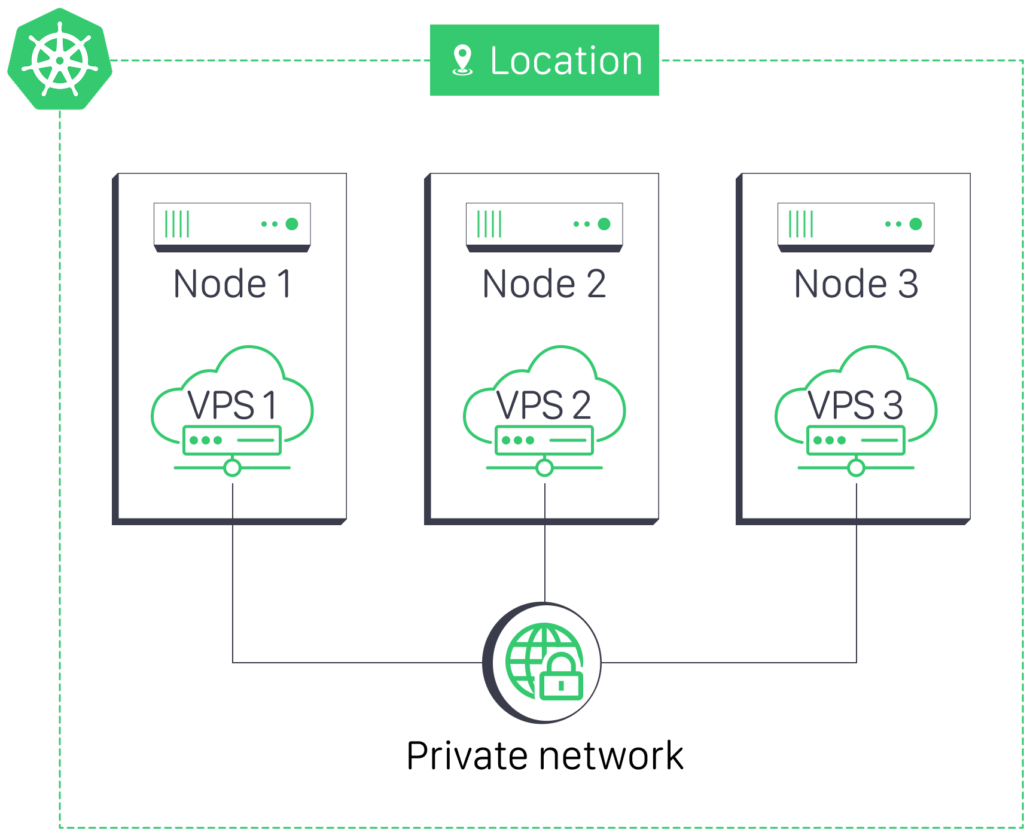
Network Configuration
Configure Private Network Interfaces
Edit the /etc/network/interfaces file on each VPS:
VPS Cloud 1:
auto eth1

iface eth1 inet static

address 10.10.0.2

netmask 255.255.255.0
VPS Cloud 2:
auto eth1

iface eth1 inet static

address 10.10.0.3

netmask 255.255.255.0
VPS Cloud 3:
auto eth1

iface eth1 inet static

address 10.10.0.4

netmask 255.255.255.0
Apply Network Configuration
Restart the networking service on each node:
sudo systemctl restart networking.service
Verify Connectivity
Test connectivity between all nodes:
ping 10.10.0.3

ping 10.10.0.4
Kubernetes Installation
Install Required Packages
Update package lists and install prerequisites:
sudo apt-get update

sudo apt-get install -y apt-transport-https ca-certificates curl software-properties-common
Add Kubernetes apt repository:
curl -s https://packages.cloud.google.com/apt/doc/apt-key.gpg | sudo apt-key add -

echo "deb https://apt.kubernetes.io/ kubernetes-xenial main" | sudo tee /etc/apt/sources.list.d/kubernetes.list
Update package lists again and install Kubernetes components:
sudo apt-get update

sudo apt-get install -y kubelet kubeadm kubectl

sudo apt-mark hold kubelet kubeadm kubectl
Configure Container Runtime
Install and configure containerd:
sudo apt-get update

sudo apt-get install -y containerd
Create default configuration:
sudo mkdir -p /etc/containerd

containerd config default | sudo tee /etc/containerd/config.toml
Update configuration to use systemd cgroup driver:
sudo sed -i 's/SystemdCgroup = false/SystemdCgroup = true/g' /etc/containerd/config.toml
Restart containerd:
sudo systemctl restart containerd

sudo systemctl enable containerd
Initialize Kubernetes Cluster
On the control plane node (VPS Cloud 1):
sudo swapoff -a

sudo sed -i '/ swap / s/^\(.*\)$/#\1/g' /etc/fstab
Initialize the cluster with private network CIDR:
sudo kubeadm init --pod-network-cidr=10.10.0.0/24 --apiserver-advertise-address=10.10.0.2
Set up kubectl for the current user:
mkdir -p $HOME/.kube

sudo cp -i /etc/kubernetes/admin.conf $HOME/.kube/config

sudo chown $(id -u):$(id -g) $HOME/.kube/config
Install and Configure Calico CNI
Download and apply the Calico manifest:
curl https://docs.projectcalico.org/manifests/calico.yaml -O

kubectl apply -f calico.yaml
Configure Calico to use the private network CIDR:
kubectl set env daemonset/calico-node -n kube-system IP_AUTODETECTION_METHOD=cidr=10.10.0.0/24
Troubleshooting
Network Issues
- Verify interface configuration with
ip addr show - Check routing tables with
ip route - Test connectivity with
pingandtraceroute
Kubernetes Issues
- Check pod status:
kubectl get pods -A - View logs:
kubectl logs <pod-name> -n <namespace> - Check node status:
kubectl describe node <node-name>